Sunday, November 1, 2015

Home Lab Part 2, and career update

Updates

Wow, it has been a crazy couple of months. I can't believe it has been two months since my last blog post. I have had way too much going on to take the time to sit down and write a blog post. But today my friend @timcurless asked about my latest addition to my home lab so I promised I would write about it.

Career Update

As some of you may know, in August I accepted a position with VMware as a TAM (Technical Account Manager). Working for VMware is everything you can imagine: exciting, crazy, fun, busy, and there are way too many shiny objects to chase. You can't possibly chase them all. Anyway, I'll write more about working for VMware later.

Home Lab Part 2 - New ESXi Server

My first home lab server is a 1U SuperMicro X7DBR-E 2x Xeon E5440 2.83ghz Quad Core with 32 GB of RAM. I bought it off of eBay for less than $200. It has worked well for a starter home lab but it is time to add on.

One thing I did not like about the rack mount 1U server is the noise level. So when I thought about adding on, this was my first requirement. The rest of my requirements were pretty simple. I have one goal with my home lab. That goal is to get some stick time with all of VMware's software so that I can better support my customers. It doesn't need to run at top speed but I don't want it to slow down my testing either. Enterprise class rack-mount servers don't usually take into account power consumption. At home I don't need my power bill going crazy for a home lab testing. So low power consumption is important.

So here were my requirements:


  1. Silence
  2. Low power consumption
  3. Capable of running ESXi 6.x
  4. Enough network ports to run NFS\iSCSI on independent ports
  5. IP KVM
  6. 32 GB of RAM or more


After much research I chose to build my own server from scratch. Here is my parts list.

Supermicro A1SRi-2758F
http://www.newegg.com/Product/Product.aspx?Item=N82E16813182855

Kingston 32 GB RAM
http://www.newegg.com/Product/Product.aspx?Item=N82E16820239958

RaidMax Case
http://www.newegg.com/Product/Product.aspx?Item=N82E16811156340

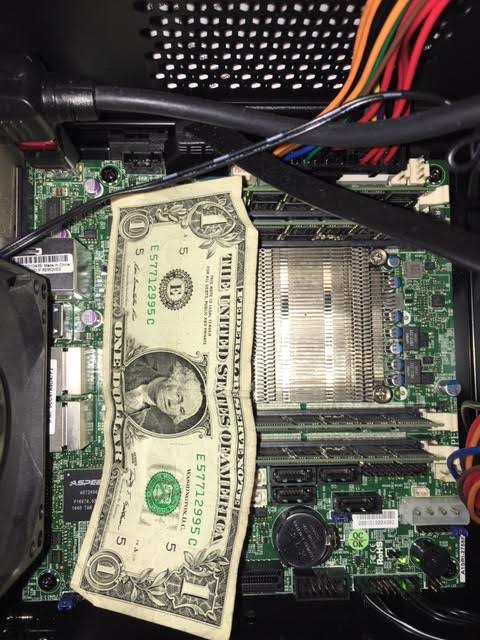
First of all, this is the first time I have ever seen a mini ITX motherboard. Wow, these things are tiny!
Here is a picture of mine in the case with a dollar bill for size reference. Notice there are no fans on the motherboard as the cooling is completely passive.


This is what it looks like in the ESXi fat client.


There is one fan on the case at the back and it is completely silent.  The spinning hard drives in my Synology are the loudest thing in my home lab now. The old 1U rack-mount server has been moved to the garage because it was too loud to be in my home office.


Power consumption was a big deal for me also. So, because I am a geek, I ,of course, have a Kill a watt to measure the power consumption of all my electronics.


Here is the power consumption while it is running at 5ghz and 23GB RAM used.
27 Watts!

So far this server is perfect for my home lab and hopefully VMware will continue to support the Intel Atom processor. I will be sure to ask engineering for continued support, now that I work for VMware ;-)
I love the motherboard and all the features that it comes with.
The IP KVM was all I needed to install ESXi 6. I didn't have to load any custom drivers at all everything is a native load of ESXi 6.

Couple of things to note.
I installed ESXi onto a USB Stick. So this server is currently setup to boot from USB.
It has 2x SATA3 6Gbps ports and 4x SATA2 ports 3Gbps, ESXi does recognize them on a native install of ESXi 6. I currently don't have any drives to plug into it to test it with. Right now all I need is my Synology NAS, Though at some point I would like to play with VSAN. Sounds like a future blog post.

Thats all for now.
drop any questions in the comments below.

Heath
Thursday, July 30, 2015

VMware Home Lab - Part 1


Since I started working for a VMware partner in March, I have slowly been building my home VMware lab. My most recent addition has been a new layer 3 switch. I needed layer 3 switching so I could setup VMware NSX in my home lab with multiple VLANs and fully test micro-segmentation. I made a quick list of requirements for what I was looking for in a switch before I went hunting.

My Requirements


  • Silence - (Fan-less design)
  • Low power consumption - (This switch is rated to draw 110V=19.8W)
  • Enough ports to operate 3 or 4 hosts with 4 - 1GB NICs each and my Synology NAS 415+.
  • Support for VLANS
  • Support for LACP/LAG
  • Layer 3 routing
  • Low cost
After doing some research online, I decided on the Cisco SG300-28. It gave me the most ports possible and still remaining fan-less and meeting all of my other requirements. The price was right too, I caught a sale online and was able to purchase it for $318. That comes out to $11.35 per port. Not bad for all these features.

The switch has a CLI interface that is very similar to a Cisco Catalyst switch. It also comes with a nice GUI web interface for configuring it as well. So it keeps all admins happy.

One big gotcha that I ran into right away is that by default layer 3 mode is disabled. Below is the setting in the web interface to enable layer 3. 

After getting the switch setup in layer 2 mode I went to enable layer 3 and this neat little warning comes up. As Lenny Pepperbottom would say How neat is that?

So, after configuring all of my settings enabling layer 3, this switch deletes your config and starts over from scratch. Great switch, but that's rather annoying. But it gave me extra practice on setting the switch up again.

Next time I'll talk about how I enabled Link aggregation on my ESXi hosts and also enabled LACP on my Synology NAS array.


Monday, July 20, 2015

Audit your guest VM's to check for unused Advanced VM Settings

I'm a big fan of using PowerShell in VMware systems management. Whenever I have a long repetitive task I look for a way to script it so I can speed up the process.

I was working on some security auditing tasks and one of the requirements in the VMware hardening guide is to make sure that none of your VM Guests have any advanced settings that may be left over from VMware Workstation or VMware Fusion. VMware actually says that security conscience organizations should explicitly disable these settings.

See VMware hardening recommendation here.
http://pubs.vmware.com/vsphere-51/index.jsp?topic=%2Fcom.vmware.vsphere.security.doc%2FGUID-60E83710-8295-41A2-9C9D-83DEBB6872C2.html

In any environment it would take a long time to check every VM one at a time and look for all of these settings.

I did some research and put together a few script that can check every guest VM and look for all of these settings and export the findings into a single .csv file to sort. This is a great tool to help you audit your enviroment, and provide proof to your security team.

Disclaimer, I'm not an expert PowerShell coder. I'm sure there are more efficient ways to do this. Feel free to drop a comment on how to make this code better.
All code is downloaded and used at your own risk. Be sure to understand what the code is doing.

Below is the PowerShell script needed to run this audit.

 
# Change as needed to connnect to a different Virtual Center
Connect-VIserver yourvcentername

#Define Which Cluster to scan
$Cluster = yourclustername

#define the Settings you want to look for in each VMX file
$AdvSettings = "tools.guestlib.enableHostInfo","isolation.tools.ghi.autologon.disable","isolation.bios.bbs.disable","isolation.tools.getCreds.disable","isolation.tools.ghi.launchmenu.change","isolation.tools.memSchedFakeSampleStats.disable","isolation.tools.ghi.protocolhandler.info.disable",
"isolation.ghi.host.shellAction.disable","isolation.tools.dispTopoRequest.disable","isolation.tools.trashFolderState.disable","isolation.tools.ghi.trayicon.disable","isolation.tools.unity.disable","isolation.tools.unity.disable","isolation.tools.unityInterlockOperation.disable",
"isolation.tools.unity.push.update.disable","isolation.tools.unity.taskbar.disable","isolation.tools.unityActive.disable","isolation.tools.unity.windowContents.disable","isolation.tools.vmxDnDVersionGet.disable","isolation.tools.guestDnDVersionSet.disable"

#Create the Column Header
$CreateColumnHeader ="Name", "Key", "Setting"
$psObject = $null

$psObject = New-Object psobject

foreach($o in $CreateColumnHeader)

{
Add-Member -InputObject $psobject -MemberType noteproperty -Name $o -Value $Null
}

$psObject|Export-Csv  .\Output.csv -NoTypeInformation


#read each VMX file,and export results to csv file
Foreach ($AdvSetting in $AdvSettings)
{
Get-Cluster $Cluster | Get-VM  |Select Name, @{N="Key";E={$AdvSetting}}, @{N="Setting";E={($_ | Get-AdvancedSetting -Name $AdvSetting).Value }} | ConvertTo-Csv | Select-Object -Skip 2 | Out-file -Append -FilePath .\Output.csv -Encoding ASCII
}


Friday, July 10, 2015

Don't forget to check the HCL

A few weeks ago I had a customer that implemented some new hardware into their VMware enviroment. They ran into some major problems with VMotion.

 Now your probably thinking they purchased some commodity hardware that was completely unsupported. Actually they purchased some brand new HP DL380 Gen 9 servers. All the components in this server are in the HCL. In fact the version of VMware that they were running is still fully supported by VMware.

So where did they go wrong?
If you check the VMware HCL for a HP DL380 Gen 9 server you will see that it is supported for ESXi versions  5.1 - 6. My customer was running version ESXi 5.0. The customer was able to install version 5.0 and get it running without issue. Where they ran into problems was with VMware EVC mode and VMotion.

What is EVC  mode?
EVC mode is a software solution for a hardware problem. Intel and AMD CPU's are constantly changing and adding new features and instruction sets with each new"family" or generation of CPU's.
This is a problem for VMware Virtualization when you use VMotion. With VMotion all servers in a cluster must have the same exact CPU instruction sets available. If they don't and a VM guest is using a newer instruction set it will not be able to be moved to a older CPU without that doesn't have that feature. The solution that VMware came up with is EVC mode. Turning this feature on in your cluster "masks" or hides the instruction sets of the new CPU's and only allows the VM Guests to see instructions that are the same across all the hosts in a cluster.

Back to the Customers Issue
For my customer they were running one older HP DL380 Gen 8 server that had a Sandy Bridge Intel Processor. EVC mode was enabled and running as "Sandy Bridge Mode", however EVC mode in version 5.0 is not compatible with  a new Intel Haswell processor. In fact older versions of EVC doesn't even know about the new instruction sets that are available in Haswell or Ivy Bridge. Because of this EVC didn't even know how to mask or hide them. With EVC mode enabled is seemed to work for a little while, but the customer learned that they could only VMotion from the Gen8 host to the Gen9 host, not the other way around. It was a one way trip. If they tried to move a VM guest from a new host to an old host, this Error occurred.


The Fix
After doing some research on the issue I checked the HCL for the Gen 9 HP server and discovered that it was not compatible with ESXi 5.0. So we proceeded to upgrade Virtual Center and the ESXi hosts to version 5.5. After completing the upgrade and enabling EVC mode in the cluster again. Along with a hand full of cold boots of VMware Guests, the issue was resolved.

When your making any hardware changes, always check the HCL first.

VMware Hardware Compatibility List
http://www.vmware.com/resources/compatibility/search.php


Safety First!

Today started out crazy, My wife is a runner and goes on a run almost every morning. I decided to join her for part of it and take a morni...